Think about refreshing a single wall to instantly shift your home’s atmosphere without the need for costly renovations. My goal is to show you the process of incorporating wall mural painting as a creative way to enhance any room’s personality and style. A mural can be made with paint, premium wall decals, or installed wallpaper. It can range from soft decorative wall art to a bold focal feature for the entire room.
Click Here For Custom Mural Painting
Whether you choose a professional mural artist, whose services average around $4,800 nationally, or take the DIY route to save money, careful planning is key. I’ll walk you through the essential steps: from gathering references to selecting high-quality materials like premium acrylics. We’ll also discuss the differences between accent wall murals and those that cover the entire room. This helps ensure your mural artwork complements the room perfectly.
Key Takeaways
- Wall mural painting can transform a room and may be created with paint, decals, or wallpaper.
- Accent wall murals and full-room murals differ in appearance, scale, and budget.
- Hiring a mural artist averages around $4,800 nationally, but doing it yourself may save money.
- Careful planning with references, sketches, and materials leads to better mural artwork.
- Exterior and patio murals carry your wall art decor beyond the inside of the home.
Inspiring Wall Mural Painting Ideas For Every Space
I guide homeowners and designers in selecting the perfect wall mural painting approach. This involves considering the impact, budget, and space available. An accent wall mural can serve as a focal point, while a full-room mural transforms the entire atmosphere. Your choice should align with the room’s purpose and your maintenance and time preferences.

Accent Wall Murals Versus Full-Room Murals
An accent wall mural is perfect for creating visual impact without overwhelming the space. It works with furniture and textiles and is excellent for anchoring a living room or bedroom.
By contrast, a full-room mural offers a more immersive experience. It’s best for creating a cohesive scene, such as a woodland wrap in a nursery or a skyscape in a loft. This option comes with higher costs and requires more time for a custom design.
Indoor Mural Ideas: Nursery, Living Room, Kitchen, And Home Office
In nurseries, murals often feature playful, stylized designs. Choose simple shapes and soft color palettes to keep the space calm and age-appropriate.
Within living rooms, large wall art or oversized mural concepts can anchor seating areas. The scale should complement the sofa or fireplace.
Graphic, hand-painted mural elements work especially well in kitchens and home offices. These add energy without clutter. Quick, bold shapes are efficient and easy to maintain.
Outdoor And Exterior Mural Concepts For Patios And Garden Walls
Exterior mural artwork extends living spaces into the landscape. Painted florals, tropical motifs, or gentle trompe-l’œil can visually connect patios to plantings.
Weather-rated paints and sealers are important for durability. I design the composition around light, sightlines, and nearby hardscape so it complements the yard year-round.
Large Wall Art And Oversized Mural Concepts To Make A Statement
Oversized mural work naturally commands attention and helps define public rooms or commercial spaces. Planning scaffolding, staging, and a simplified palette helps manage both time and materials.
As mural size grows, bold shapes and high-contrast areas read better than tiny realism. This approach reads well from a distance and maintains coherence up close.
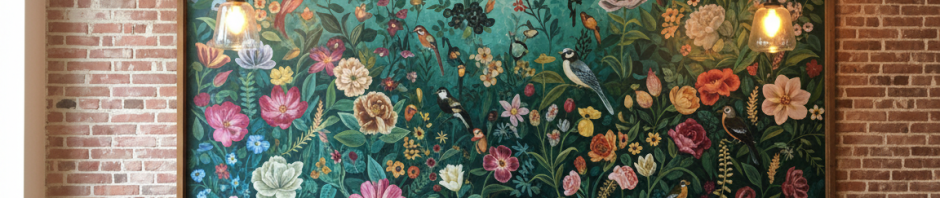
Hand-Painted Murals And Hand Painted Mural Styles: Graphic, Realistic, And Stylized
Hand-painted murals provide texture and a human touch that printed wallpaper cannot match. Graphic styles use clear lines and flat color for modern homes.
A realistic mural style takes more time and careful reference work. These are ideal for illusionistic scenes or portraits when budget is available.
Stylized hand-painted murals sit between graphic and realistic styles. This style makes personalization easier with simplified forms and unique color choices tied to the room and your taste.
Planning Your Custom Mural Design And Budget
I start every project by defining clear goals for scope, timeline, and visual outcome. Early decisions on design, materials, and whether to DIY or seek professional help are critical. This helps save time and prevents costly revisions down the road.
Collecting References And Researching Mural Design Ideas
I pull together reference images from architecture, landscape photography, and professional mural portfolios. They help ensure the mural fits both the home’s aesthetic and the client’s vision. I document my sources so I can clearly explain design choices to clients or family members.
Creating Sketches And Mockups To Present To Clients Or Household Members
I first sketch loosely, then refine the most promising idea into a detailed mockup. Using chalk on walls allows for flexible, erasable guides during the initial stages. A mockup helps confirm placement, scale, and color before I start painting.
Cost Considerations: DIY Savings Versus Hiring Professional Mural Painters
I weigh DIY expenses against quotes from local companies and experienced mural painters. Professional rates typically range around $4,800, influenced by size, surface quality, and complexity. DIY can reduce costs, but it usually requires more time and can lead to less consistent finishes.
Choosing Materials: High-Quality Acrylics, Primers, Sealers, And Tools
I advocate for using premium supplies like Golden acrylics for superior coverage and quicker application. Your budget should include primer, sealers, painter’s tape, rollers, brushes, tarps, and any tools needed for projection or stenciling. Maintaining a detailed list of expenses helps with cost tracking and reimbursement management.
I plan the schedule with a buffer for drying, touch-ups, and client feedback. Thorough planning and realistic budgeting ensure the mural’s full impact without unexpected issues.
Wall Mural Painting
I explain my mural process to help you create similar results. Careful preparation helps prevent problems later. I begin by cleaning the surface thoroughly, filling cracks, and sanding rough areas smooth. Before priming, I determine whether the mural will be an accent wall or cover the entire room.
Applying the base coat with rollers helps keep the layer even. It is an efficient method for large surfaces and gives the wall a consistent base color. I protect trim and outlets with painter’s tape while covering floors with tarps to simplify cleanup after installation.
Transferring designs is a critical step. With simple designs, colored chalk works well because it is easy to erase. For more complex layouts, I use a projector at night or rely on the grid method for accurate scaling. Stencils are a major help whenever precise pattern repetition is needed.
I begin large walls by painting broad areas of color to build the structure of the composition. Next, I add midtones and darker values in layers. I prioritize broad strokes and save the fine detail for later to avoid wasting time and overworking the design.
I opt for high-quality acrylics for their opacity and quick coverage. For outdoor projects, I choose weatherproof primers, UV-resistant paints, and durable sealers to protect the mural from the elements.
The final stage involves adding texture and highlights to build depth. I test small areas to perfect glazing and brushwork techniques before applying protective topcoats. In public or client spaces, I make sure drying times, scaffold access, and final cleanup are all scheduled in advance.
- Preparation: clean, repair, prime, and roll on the base coat.
- Design transfer: chalk sketches, projection, grid methods, and stencils.
- Efficient workflow: block color first, layer gradually, and do not overwork the details.
- Finish: add texture, highlights, sealers, and consider mural installation logistics.
Mural Artist Tips, Tools, And Best Practices
I share practical advice I use on jobs and in workshops. These notes cover tools, time management, product choices, project logistics, and mural maintenance. They can help you work more effectively while protecting your mural for years to come.
Essential Tools
I rely on a straightforward kit: brushes for edges and detail, rollers for large areas, painter’s tape for crisp lines, tarps for floor protection, and ladders or scaffolding when the scale requires them. It helps to keep multiple roller sizes and synthetic brushes that work well with acrylics.
Time Management And Workflow
I plan milestones and add buffer time. Big walls tend to take longer than sketches initially imply. I break work into focused sessions and avoid overworking one area. Podcasts and instructional videos help keep long days focused and productive.
Product Recommendations
My recommendation is high-quality acrylics like Golden, since they cover quickly and opaquely. Higher-quality paint reduces extra layering and touchups, which saves time. Maintain an inventory log for paint, rollers, and brushes so your expenses are clear during invoicing.
Project Logistics
I carefully track time, receipts, and any changes to the project scope. Strong mockups and clear timelines help avoid confusion with clients or members of the household. When I price a project, I compare against national averages and make sure experience is properly valued whether the quote comes from a company or a solo mural artist.
Safety And Mural Maintenance
On scaffolding, I use harnesses and guardrails, and I secure tarps to reduce slip risks. For outdoor work I apply UV-resistant sealers and recommend gentle cleaning methods to clients. Regular touchups combined with a maintenance plan extend the life of the mural and preserve the original vision.
Working With Clients And Teams
- I communicate progress using clear notes and simple photos.
- I maintain a log of project logistics so billing remains transparent.
- I explain care steps and limits so clients understand how to preserve the mural.
From my experience, these practices improve results on residential and commercial projects alike. Whether you work with mural painters, operate a mural painting company, or hire professional mural services, clear tools, schedules, and maintenance guidance make the project run more smoothly.
Conclusion
Wall mural painting can dramatically change a room, from a small accent wall to a large, hand-painted mural that dominates the space. Whether you decide to paint it yourself or hire professionals, planning remains essential. It involves gathering design ideas, setting a realistic timeline, and budgeting wisely. Professional costs can range from $4,800, so consider the value of expertise against the cost savings of a DIY project.
Proper mural installation starts with detailed preparation. It is smart to gather references, prepare sketches or mockups, and choose durable materials. High-quality acrylics like Golden work well indoors and outdoors. Outdoor murals on patios and garden walls should use paints and sealers that can withstand the elements.
You should also keep careful records of expenses and communicate openly with clients or family members. Reasonable pricing and a little extra time in the schedule can reduce errors. With thoughtful planning, good tools, and attention to detail, the finished mural can become a long-lasting piece of decor that highlights your personal style and dedication.